Friday, January 30, 2009

Skirt Report, Part 3

"What's a fabric like you doing in a place like this?" I didn't say it, but I thought it!

In a pretty little quilt shop by the sea, surrounded by shabby chic and pretty floral prints. And in the middle of a shelf was this:
Black sequinned, lycra, multicoloured glossy synthetic bling on a bolt.

E loved it and metre of it came home with me to be the flounce on the next incarnation of the skirt with attitude.

I'll find a basic black for the main part of the skirt and the bit of lycra-stretch won't matter for the flounce as long as I pin it nice and securely, and stitch it carefully.

Thursday, January 29, 2009

Skirt Report, Part 2

Yesterday's post was the first part of this "critical review" of the little flounce skirt. If the test is "I love it, then it passes with flying colours. Or, to be more precise, with swishing sequins!

Today I'm doing the "hold still and let me look at you" test.

Front view:
. . . not too bad, I can see it's pulling a bit around the hip area.

The side view tells a bit more of the story:

It's pulling up at the back. The back hem is raised and the fit in the seat area isn't good.

I'm looking for a very easy fix, since this is supposed to be a very simple little skirt pattern. For a start, E's definitely not letting go of this skirt. So any changes will be on a new skirt altogether. That means I can fiddle with the pattern and have another go at it.

The original skirt pattern used exactly the same pattern piece for the front and for the back. As you can see, that approximation wasn't good enough in this case. So, I"ll go for front and back pieces that are just a bit different.
  • - I'm going to leave the front as is.
  • - I'll try making the back piece a bit wider all round. I can achieve that by simply moving the centre-back fold line out a cm or so.
  • - That will mean that the skirt's a bit wider at the waist as well, which E doesn't need.
  • - The elastic at the waist will take in the excess and we should get a better look.

That's the simplest solution and that's what I'm going to try first.


Wednesday, January 28, 2009

Skirt Report, Part 1

Here's how the little denim skirt with flounce looks when it's being enjoyed:
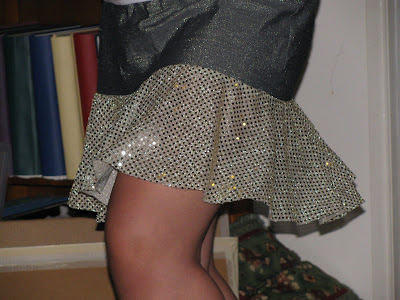
. . . that's a happy little skirt--and a happy E showing it off. This is where I get to remind myself that "flounce" is both a technical term and, more importantly, an attitude!

I did do a more detailed critique of the fit and I have some changes to make to the pattern, but that can wait for my next post. The temperature back in Melbourne is in the mid-forties--heat wave material--and I'm too hot to even think about measuring and tracing.

Tuesday, January 27, 2009

Scissors, Scissors and More Scissors

I did confess earlier that I have a particular appreciation for a good pair of scissors. Even so, I failed to introduce these two:
The pair at the top are called Pinking Shears. Don't ask me why! Here's what they do:
That zig-zag looking edge isn't for decoration. It's another way of finishing off a raw edge of fabric. Quicker, easier and cheaper than sewing a line of zig-zag stitching. We decided to pink the raw edges on the inside of the cushion covers, since they will rarely see the light of day. This edge is ok to go in the washing machine, but I wouldn't use it for a garment, though some people do.

I don't know the proper name for the other scissors. Back in my days of medical work, I knew them as "plaster scissors". We'd use them to cut through the last few layers of a plaster cast. I just asked A what she called them. She said, "they're Mutti's Super Scissors".
. . . you're getting the idea that they will cut through just about anything. They came into their own in the Cushion Cover project. We used them to cut off the spare length of zipper when we had one that was too long. D did that after the zip was sewn in. And she put in several lines of stitching to secure the end of the zipper before she cut the zip off short.

Sunday, January 25, 2009

Cushion Covers Continued

Meet the team . . .
  • J & A, designers:
. . . they went for variety.
  • C, yours truly, on ruler and scissor duty:
. . . my challenge was to convert ideas into fabric ready to sew. I had to add the 1.5 seam allowance to each side of each piece. That's in italics because a couple of times I mixed it up. An extra strip of fabric solved the problem and ended up looking like a feature.
  • D on the sewing machine:
. . . it's her machine, and I was in no mood for sewing zippers that day.
  • A, also starred on the stitch ripper
  • and J took over the camera. thanks for the pics J:)

The Cushion Cover Cooperative

Here are the fabrics I had left over from the doona cover project:
We decided it would be great to add scatter cushions in matching fabrics to enhance the look. There were four of us involved in the project--it turned out to be a fun morning of work, plus a bit of finishing off the next day.

First step was to measure and design:
A tip for making cushion covers: make the cover a bit smaller than the cushion insert. It sounds contradictory, I know, but that way the cushion will look nice and plump. Otherwise it always looks a little bit hungry.

Our cushion inserts actually came with covers--for some strange reason it was cheaper to buy them that way than to buy just the inserts. Since we had a team on the job, one person was delegated to rescue the zips from the covers that weren't needed, while the rest of us got started making up the new covers.

The cushion covers we took off were 41 cm square, so we went with 40 cm square for a nice easy figure to work with.

A tip for working with zips: never, never, let the slider come off the end of the strips of little teeth. Getting it back on is not fun!

Saturday, January 24, 2009

Not too big to Photograph now

Here's the King-size doona cover that was "too big to photograph" before Christmas. Also, at that stage it hadn't been given to the intended recipient. Now here it is in place on her bed:As I mentioned in my ZTwist blog--www.ztwistart.blogspot.com--I'm in sunny (sweaty) Queensland for a few days. It's way too hot to actually use a doona (continental quilt) here just now. So it's just sitting over the bed as a cover to make it look pretty.

We spent the best part of yesterday designing and making the cushion-covers that are piled up at the top of the bed. Details to come.

Thursday, January 22, 2009

Bias Binding Step by Step

Here's how finishing off a curved edge with bias binding works, step by step.

Curved edge--this is the neckline, but I'm going to do an armhole--the process is the same:
Bias binding opened out, with raw edge lined up with the armhole edge. Lots of pins to keep the edges in place:
The first line of stitching goes on the fold line of the bias binding.

Then I fold the bias binding through to the inside. This is pretty blue satin bias binding and so I want a bit of it to show on the right side too, so I've folded it over the edge, rather than folding on the stitching line:
Lots of pins again to hold everything in place--it is a curved edge after all. The next line of stitching goes right on top of the first line of stitching, but now the bias binding is sitting in behind, so it will get caught with this stitching and held in place nicely.

Here it is, all done:

In the previous post, I showed the effect if the bias binding gets folded all the way through to the inside. In that case the second line of stitching just goes on the edge of the bias binding.


Here's One I Prepared Earlier

This is a little sleeveless top, just like the one I was talking about in my last post. In fact, it was the one I was wearing while I was typing, so it was otherwise occupied and couldn't appear in person:)

It's inside-out in the pic. The bias bindng has been stitched to the raw edge of the armhole and neckline, turned through to the inside and stitched again. All the stitching was done by machine and it's a nice neat finish.

I've chosen bias binding that matches the fabric of the garment, but it doesn't feature on the right side at all.

Wednesday, January 21, 2009

Tidy Finishes

I guess you could really reduce all sewing jobs into one of three categories:
  1. sewing that joins pieces of fabric together
  2. sewing that tidies up raw edges of fabric
  3. sewing that decorates fabric

Yesterday I got back to the task of finishing off a sleeveless summer top, since I'm off to visit friends in Queensland tomorrow. The top was all put together--a couple of months ago--and all that it needs to be wearable is a hem at the bottom and some sort of finishing at the arm-holes and neckline. So what I need is a dose of #2--sewing that tidies up raw edges of fabric.

The hem is easy--just like the hems for the skirts and shorts--zig-zag the raw edge, fold a couple of cm up and stitch. Can do!

The armholes and neckline are not so straightforward, since they are curved edges. Folding in a couple of cm on a curved edge just makes a bit of a wrinkly mess.

One option would have been to make a facing. A facing is like a bit of lining--the same shape as part of the garment, but in the case of a facing, not the complete garment--just enough to sort out the raw edge problem and sit neatly on the inside out of sight. There's the catch. For a start using a facing means you end up with a double thickness of fabric. Great for something tailored, but not really what I want for a "light as possible, just enough to be decent when it's terribly hot" top. And then there's the challenge of getting the facing to sit nicely on the inside of the garment. It can be done, but it's not the solution I would choose for this top.

Here's what I decided to use:

It's bias binding. Great stuff for going around corners because it's not cut on the straight grain of the fabric. It's cut on the bias. The straight grain is the direction in which the fabric was woven. It's the direction the fabric wants to hang. It's stable. The bias is as far away from the straight grain as you can get--45 degrees from the straight grain. It's the most unstable, stretchy direction of the fabric. In this cas that's exactly what I want. What's more, bias binding comes pre-cut and pre-folded, on a card, like this, or off a roll.

So here's the plan:
  • stitch one raw edge of the bias binding to the raw edge of my garment
  • fold it around to the inside of the garment
  • stitch it down on the inside
  • I need to fold back the beginning of the bias binding and overlap the end to finish the circle off nicely.

There are various ways of doing that, and various widths of bias binding you can buy, and, and, and . . . but that's the general idea. I'll get to work on it.


Tuesday, January 20, 2009

My Little Black Book

My first task for this morning is to clear up a bit and make some rom to think about my next project.

Here's the part of the cutting table that is clear enough for a photo. And that's my little "black book" on the left. Not so little, not so black! It's where I keep information like body measurements, pattern alterations and rough sketches for the clothes I make without a pattern. That way I can find them when I need them again. At least, that's if I can find the book--sometimes it's under a pile of fabric scraps and I drive myself crazy looking for it!


The other item featured in this pic is the pattern I've just finished using. Remember that pile of papers: pattern instruction and out of control tissue paper? There's no way it was going to fit back in the original envelope. It never does for me. Plus there's the pattern I've traced off and used, which I'd like to keep with the original for now. So it's all in a clear plastic sleeve together and it will go in the box with the rest of my pattern collection.

Monday, January 19, 2009

Yes, but Why?

The shorts are finished! They will be hand delivered to A when I travel to QLd later this week.

As I put the last few stitches in them this morning I was thinking about why I sew like this. At the risk of sounding just a little too slick, I will give three points:
  • Fun
  • Fit
  • Features
  1. Fun--I just like sewing. I was the girl who at age 12 asked for a toy sewing machine that really worked, and got my beloved old Singer instead. It's been really working for me ever since.

  2. Fit--Ready made clothes are made to fit some hypothetical ideal, standard-shaped female. I'm no standard female in any respect and my shape is far from ideal. In fact I am still to meet an "ideal, standard-shaped female". Sewing allows me to make adjustments to cope with my reality . . . a bit wider here, a bit shorter there . . .

  3. Features--I can pick and choose my features when I sew. The shorts I've just finished for A are a good example. She wanted loose-fitting, hipster PJ pants in a light cotton. There probably would be a pair like that in the shops that would fit her. But she likes her summer PJ pants knee length and she loves blue stars. Sewing it myself, it was easy to work in those features. And that's just in a really simple garment.

Sunday, January 18, 2009

Three Key Steps for Sewing Pants

Here are the three key steps in making any pair of pants:
1. Centre Front Seam:
The centre back seam is similar.
2. Side Seams:


3. Inside leg seam:

Here's an extra tip for the inside leg or crotch seam:
  • remember the notches are there to show where seams are supposed to match . . . here's how it looks when I match the centre front & centre back seams--thats's the pin at the far left of the pic--and the notches on the inner leg seams--that's where my fingers are holding.

  • There's a bit too much fabric in one part of the seam. It is supposed to be there. The pattern instruction says something like "stretch back to fit".
  • So I match up the points that I know must match and make the rest line up.
  • I couldn't have done that without the notches!

Now I've got something that looks like a pair of pants:Still to do:

  • casing
  • hems
  • elastic
  • topstitching

and the job's done.


Saturday, January 17, 2009

Back to the Shorts

The quilt is done! At least all except for the binding, which I need to stitch down by hand and that's about 2/3 done and sitting on my favourite armchair waiting for me to get on with it next time I make myself a nice coffee.

So, back to the shorts!

Here they are cut out:
A few points about my traced pattern:
  • I've drawn in the grain line--that's the line that I have to place parallel to the selvedge of the fabric so the garment will hang nicely. It's important:)
  • I've copied and used the "notches" These are markings on the pattern--usually marked as a small V in the seam allowance--which show where pattern pieces line up with each other. You can have single V, double VV or even triple VVV markings so you don't get mixed up.
  • I usually cut my notches as a bit sticking out from the seam allowance, rather than cut out of the seam allowance. In other words, I give myself a tiny bit of extra fabric, rather than snipping a bit of fabric out. I do that because I have a habit of missing notches when I cut out and I like to have them there when I'm sewing--so if they're sticking out of the pattern cutting line I'm less likely to miss them. Theoretically though, some people say that snipping notches out of the seam allowance will weaken the seam line.

I've also written all over the pattern pieces

  • The name and number of the commercial pattern I've traced it from. That way it's easy to refer back to the original if there are any mix ups.
  • The size I've traced--remember there were 7 sizes in this one pattern.
  • The number of the pattern piece--I've used pieces 14 & 15 from the 16 different pieces in the pattern envelope. In this case it's pretty obvious because they're the only two main pattern pieces for the pants, but this pattern has 4 different styles of tops in the one envelope, so it could be easy to get mixed up with some of those. I just do this as a habit so I don't forget it the one time when it's really important.
  • There's also a personal note that reminds me what I've done with this pattern piece. "A PJ's Jan '09 and Blog" That's because I do a fair bit of sewing for myself and a few friends. If these PJ pants turn out OK I can predict that A might say to me "Could you make me another pair of PJ pants like the ones you made for the blog last January?" So the info is right there where I need it.
  • I would also have made a note of any alterations from the original pattern. There aren't any in this case as it's a first try and I'm hoping it will be pretty well right as is.

Friday, January 16, 2009

At the Risk of Repeating Myself . . .

This tension is not quie happy and consequently neither am I!

This is the underside of my quilt:
It's not all loopy and crazy like it was the other day, but the little red points you can see in between the white stitching is actually the thread from the topside. The fact that it's visible on the underside means that it's being pulled down too far. So either the top tension is too loose or the bottom tension is too tight.

I've fiddled with it a bit and increased the top tension a couple of notches and it's not too bad now. But I thought it was worth illustrating what "not quite right" looks like as compared with "really terrible" and "ok" which you've already seen.

. . . and I'm out of ice-cream!

Thursday, January 15, 2009

Another Note about Tension Control

. . . other than ice-cream!

The tension control only engages when the presser foot is down.

Happy Stitching

I just needed to check this morning that the tension on my machine really is happy, after the difficulties I had yesterday.

Here's my test strip . I've used some scrap fabric and an offcut of wadding because the test piece needs to be similar to the actual project.

Top side:
Underside:
The stitches are clearly formed on each side and the threads aren't being pulled to one side or the other. It's also nice and stable when I try to pull the fabric pieces apart. I'm happy enough with that.
Yesterday wasn't my best day . . . just after my "tension troubles" were over, I ran out of the thread I'm using for the quilting. So, buying that is on the list for today. I'm still hoping to have this quilt out of the way this week and looking forward to getting back to the shorts.

Wednesday, January 14, 2009

Tension Troubles

No, not a comment on my mental state, or at least, not before the machine started playing up!

My task for the day was to finish off the quilt for the Neighbourhood House class and I was pretty well on track until this happened. . .

Here's the stitching from the topside:
. . . it almost looks ok, except it's a bit loose and wobbly looking--as if nothing is really holding it together.

And here it is from the underside:

. . . a disaster of loose, loopy threads that really aren't holding anything together.

I have enough experience to know that loose stitching like this is usually a tension problem. The tension is the mechanism that holds the threads taut as they are formed so that there is a good balance between the top thread and the bottom thread. Obviously that balance was well and truly unbalanced. The fact that the extra loopiness is on the underside means that the top tension is too low. The threads are being pulled through to the underside and instead of locking in with the bobbin thread to make stitches they're making these loopy snarls.

Here's how I tried to fix it
  • checked to make sure I hadn't accidentally bumped the tension dial
  • un-threaded and re-threaded the machine, including the bobbin
  • pulled out the bobbin, cleaned under and around the bobbin case with a lint brush
  • tried adjusting the tension--the thread was pulling through to the underside, so I tried increasing the top tension--it had no effect. Not a good sign.
  • tried a different thread
  • and a different bobbin
  • adjusted the stitch length
  • took a break, had a bowl of icecream, tried it all again

No good!

I rang my sewing machine mechanic, preparing myself for the inconvenience and expense of a repair job, but hoping he could give me some tips over the phone . . .

I LOVE MY SEWING MACHINE MECHANIC! He took me through a step by step check over the phone. Turns out there was a bit of broken thread caught between the tension discs. He told me how to gently drag it out with a pin. Now my sewing machine is happy again--and so am I:)

Tuesday, January 13, 2009

Skirt #1 has found a home

Here's is J's little denim skirt, on J herself, just where it was made to be!
From what I can see in the pic, it's about the right size and length and it could do with a press after suffering the indignity of being scrunched into a post pack. But I'm satisfied with it as a "sewing 101" project.

Skirts #2 & 3 have travelled interstate in the opposite direction. Pics to come.

OK, OK, Here's the Pics

OK, this is the main part of the Demo quilt which I'm planning to teach at the Neighbourhood House--simple 9-patch with sashing . . .


. . . and here's the close up of the feature fabric: sewing baskets, mugs and tea-cups, needles and threads, scissors, rotary cutters and quilt blocks . . . what more could you ask?
You can see the two different hand-dyed cottons that I'm going to use for the borders in the bottom left of the first pic--the photo didn't auto-rotate and it's 37 in the shade here today. Despite my wonderful new cooler, this is not the coolest room in the house, so that will have to do for today!

Monday, January 12, 2009

Take-over Target

The sewing room has been taken over by a quilt!

The shorts are cut out, but won't be put together until the quilt is finished and on display, since I'm supposed to be teaching it next month . . . only the borders and some simple quilting to go, but that might take a couple of days.

I'll be back soon.

Saturday, January 10, 2009

Shorts ready to cut out

This is where the story would have started if I'd been using a favourite pattern: I have two pattern pieces ready to cut out.
Once that's done, putting the shorts together is straightforward enough . . . there are basically three seams (or 3 pairs of seams)
  1. Centre front & Centre back seams
  2. Side seams
  3. Inside leg seam/s

Then the waist casing and hems and it's all done.

I usually tackle it in that order, but it really doesn't matter much, as long as you follow some sort of logical order and keep track of where everything goes.

Friday, January 9, 2009

Choosing a Size for Shorts

To choose a size for these shorts I start by comparing two things:
  1. A's measurements against the size chart on the pattern envelope

  2. A's measurements against the garment measurements on the pattern envelope

To make pants I usually use the hip measurement as my key.


A's hip (widest point) measures up at 101cm.

  • first surprise: according to the size chart that means I should be using a size 16. I'm pretty sure A is buying about a size 10 in the shops!
  • second, not such a surprise: Size 16 on the pattern is given as 40 inches (100 cm) or 102cm if my Spanish/French interpretations are right. I'm ok to give or take a couple of cm on this one, so I won't worry about it.
  • ok now I'm looking at the garment measurement and the width at the hip for size 16 is given as 44 inches (110cm). That means the ease for this garment is a whole 10cm. That's a loose fit.
  • as an extra check I asked A to measure her crotch length for me. That means measuring the curve in the centre of her body from the waistline at the front of the garment, between her legs to the centre back also at the waistline. I wanted this to measure how loose she would like her PJ pants to be. So I asked her to measure this the way she would like the pants to fit. the answer was 62 cm.

Now it's time to open the pattern envelope and have a look at the pattern pieces I'll be using

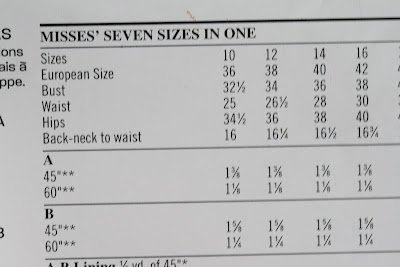
All of a sudden things are looking rather messy. There are 4 pages of instructions and two pages of tissue paper in that little envelope. I'm just looking for two pattern pieces so I can measure them.

According to the instruction sheet they should look like this:

. . . so I find those two pieces, measure the crotch length--I have to add the measurement from the front piece to the measurement for the back piece. I take off 6cm (3cm allowed for the waist casing on each piece) and another 3 cm (1.5cm for seam allowance on each piece) and the answer is . . . 60cm.

All of that confirms that I should be using size 16 on this pattern. It's a loose fit, and that corresponds with how A says she wants to wear these PJ pants. Done deal! size 16 it is. I'll make myself a coffee and trace off those two pattern pieces.

Thursday, January 8, 2009

Pattern Envelope--Guided Tour

The front of the pattern envelope includes the obvious things:
  • a picture of the garments included in the pattern--photos or drawings. The different options usually are indicated by a letter. In this case there are four styles of tops: A, B, C & D; and one style of pants: E.
  • Brand name--duh--but as you get to know different patterns the brand name actually gives you lots of information.
  • Pattern number: a lot of Pattern Companies put out catalogues from which you choose your pattern and then ask for the pattern number at the shop counter. I guess that saves a lot of display space in the shop and also prevents the patterns being knocked around since they're only made of paper, and often tissue paper at that.
  • Price code--also duh--but some patterns cost as much as a ready made garment, so that is worth knowing.
  • size range: most patterns include multiple sizes in the one envelope. In this case it's a whopping great 7 different sizes: 10-22. Often it's only 3 sizes and sometimes only 1. Sizes don't necessarily correspond with what you'd expect to buy in the shops, so that's something to check carefully.

OK, now here's the back of the pattern envelope:

Lots of information and it's worth knowing what it all means . . .

  • on the far left we have line drawings of the different garments included in the pattern. If the pictures on the front are fancy photos or drawings that are a bit too "artistic" this gives you the nitty-gritty of the garment styles.
  • the number of pattern pieces included. This will give you some idea of how complex the pattern is. In this case we have 5 styles and 16 pattern pieces. As it turns out when you look inside, the pants use only 2 main pattern pieces. That's a simple pattern. A friend of mine is currently working on a pair of shorts with 13 pattern pieces--not what I would call simple.
  • the next column demonstrates one of those annoying idiosyncrasies of most patterns. They're in multiple languages: usually english plus spanish and/or french . . .
  • and they're in both imperial and metric measurements
  • but the english version is usually in imperial measurements--that's feet and inches. So if you're an english speaker who thinks in metric measurements, like me, you either need to multiply the inches by 2.5 to get cm, or figure out the what the metric measurements mean in a foreign language--choose your challenge!
  • The bulk of this second column of information consists of size charts and fabric requirements. This tells you how much fabric you will need to make the various styles. They're often on the slightly generous side, but I would always rather have a bit too much than not enough fabric.
  • There's usually also a list of suggested fabrics--more about this later
  • and a list of "requirements" or "notions": things like buttons, elastic, zips, lace or whatever else you will need to finish off the garment.
  • some patterns also include a written description of the garments. That might sound like overkill, but some of the information is really helpful. It might tell you about the amount of ease included in the design: is the garment fitted, semi-fitted or a loose-fit?

To cut a long story short: the pattern envelope aims to give you all the information you need to do your shopping: choose a style, size, fabric and any other bits and pieces you might need.


Wednesday, January 7, 2009

Choosing a Pattern for Shorts

I've decided to use a commercial pattern for these shorts after all:


Here's why:
  • My eager volunteer, A, would like a pair of PJ-pants or sleep shorts. It's such a long time since I've made any shorts for her that I don't have a favourite pattern anywhere near right. So, I'm starting from scratch.
  • PJ's are by definition nice and loose, so I don't have to worry much about subtleties of fit--a good opportunity to try out a new pattern.
  • A's on holidays and had to get the measurements I asked for with a piece of string and a builder's tape measure while I was on the phone--a creative solution! But I didn't want to be asking for all the different measurements I'd need to draft up a new shorts pattern.

So, I looked through my pattern collection and came up with this one:

It's got several different styles of tops and a loose-fitting pair of pants with a waist casing . . . and it's multi-sized: sizes 10-22 . . . all in the one pattern.
So here comes a quick quide to exploring and using a commercial pattern.

First I need to check my supplies.:
  • It's a multi-size pattern with several different styles, so I'll want to trace off the pattern pieces I'm plannig to use. I like to trace my patterns onto interfacing and I know I used the last of my roll for the demo skirts, so that's on the shopping list for tomorrow.
  • I've got some printed cotton--quilting cotton actually--with blue stars on it. Blue stars just happens to be A's favourite, so that's an easy choice.
  • I'll need twice the length of the shorts, plus a bit for the casing and hems. Quilting cotton is generally 112 cm wide and shorts need more width of fabric than simple skirts, to allow for the different shaped pattern pieces, so I think I really will need all of that. There'll be plenty of odd shaped scraps and offcuts to put back in the quilting stash, though.


Elastic waist shorts

Making shorts is a logical next step after making a skirt, but the pattern has a few more issues to tackle:
  • Starting with what's not going to change--I'm going to stick to the elastic casing idea at the waistline I'll still need the extra fabric to fold over to form the casing at the top.
  • The key measurements of waist, hip (widest point) and distance between those two is still relevant and the amount of ease is going to need to be about the same.
  • For the skirt, I used the same pattern piece for both the front and back. The front and back of the shorts are NOT the same. The back will have to be a bit bigger than the front, so there's at least two pattern pieces to start with.
  • For the skirt the centre front (and back) were straight lines, so I could draw out half the pattern and place the centre line on the fold to get a mirror image for the other half. The shorts are still symmetrical--right and left sides are a mirror image of each other--but the pattern has to wrap around to cover the inside legs, rather than just sit flat at the front. The pattern pieces will have to have a curve to cover the crotch area.
All of this means that it's either time to get hold of a pattern or put in a bit more time and effort to draw up a personalised pattern. I found this free lesson on making your own shorts pattern: http://www.patternsthatfityou.com/frshortscl.htm. I haven't tried it out, but it looks like it covers the basics pretty well.
On the other hand, here's how the pattern drafting is set out in one of my favourite books. . . First, meet the author . . . the book is undated, but looks like it's published in the 1930's. Her first comment is about making sure you're wearing a good corset when you take your measurements! Perhaps that explains the slightly tense look on her face:)
Here's the page on drafting trousers:
  • the page on the right shows the front and back pieces joined together. The page on the right shows the back piece only. Remember the back piece is a bit larger than the front and the pointy end of the curve is at the centre of the body.
Here's the page with the back piece drawn up. She hasn't allowed for any shaping for the hip, so the side seam is a straight line.

I have a few shorts patterns I've been using for years. So, I've had a chance to adjust them to fit the way I like. I'll use one of these patterns to demonstrate the shorts and put in some comments about choosing a ready made pattern.

Tuesday, January 6, 2009

Progress and Plans

I've been cutting out blocks for a quilt this morning, so there's not much to show yet on the sewing front.

Here's an update on my progress and plans:
  • The demo skirts are on their way to intended recipients--now comes the test of how well they fit. Hopefully I'll get some photos to post . . . yep, that's a hint!
  • The pencil case is in use. It's just the right size to hold my knitting nick-nacks and I'm keeping an eye out for tips and tricks for sewing zips more effectively.
  • Next stop on the "Sew with Me" itinerary will be a pair of elastic waist shorts. I figure that's a logical progression from the elastic waist skirts

I've also been shopping around for a compact digital camera, since I'm hoping to start selling on Etsy soon. I've been using my Digital SLR just about every day and I LOVE it, but it's quite bulky and gives me a lot more than I need for every day.

Monday, January 5, 2009

Pencil Case

Here's how I made the pencil case . . .

Two pieces of denim cut to size:

Zig-zag the edge where the zipper will go; baste a seam using long straight stitch:

Press this seam open:

This zipper goes under this seam. Here it is pinned in place:
(sorry this photo's a bit too dark)

The zipper foot allows you to stitch closer to the teeth of the zip than the regular presser foot:

Pull out the big stitches which were holding the seam closed over the top of the zipper:
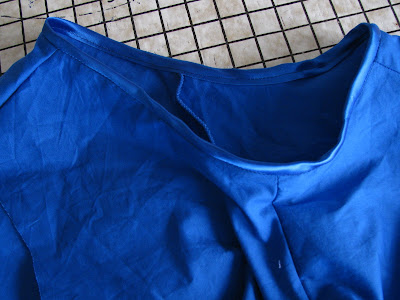
Notice that I haven't quite stitched close enough to the zip, so I had another go:

The rest of this project is pretty straightforward. I just stitched and zig-zagged the other three sides. Then turned it all through using the zip as my opening. Press seams and the job is done:

Things I learned:
  • it's a long time since I've sewed in a zip--it showed! I could do with some more practice.

  • the zip I used was a bit too long for the piece of fabric. A couple of cm shorter would have been easier. That way I could have avoided including the ends of the zip in the side seams of the pencil case.
  • Getting the stitching close enough to the teeth of the zipper to catch the seam allowance on the fabric, yet not so close as to interfere with the action of the zip is tricky. It would have been easier if I'd given myself a slightly wider seam allowance to work with.

  • . . . and this one I knew, but learned again . . . "There is no such thing as a shortcut when sewing in a zip!"