Friday, February 27, 2009

Mixed Results

I finished the lined top yesterday and photographed it this morning--on my manequin which is obviously several sizes smaller than I am.

I ironed it yesterday, really, I did! But it spent the night scrunched up on a chair in my bedroom after I realised I couldn't really wear it.

The construction is fine.

  • * The lining all sits nicely.
  • * I even managed the crazy inside-out trick of sewing the outer shoulder seam from within a space only a few inches across, which was necessary to finish it all off with no raw edges visible
  • * and I've pretty much got the fit of these tops down pat, since I've made several of them recently. It fits a lot better on me than it does on the manequin.

I like the colour. And of course, the whole point of the exercise was that it would team up with the skirt I made myself a few weeks ago.

But . . . I made a significant tactical blunder, and as soon as I put it on to wear it yesterday and looked at myself in the mirror it was glaringly obvious. The lower front section of the top is several shades lighter than the upper front section. And the skirt is, of course, the same colour as the upper front section. Which leaves me with a big band of lighter colour right across my middle. At 5-foot 2 and a bit inches with a waist measurement of 114 cm and a DD or E cup bust fitting, I just can't afford to have a big band of lighter colour right across my middle!

So, I've been reminded of something I ought to have known: beware of colour placement! I can see how I made the mistake. I thought about the colour placement in terms of the top itself, and even though the hand-dyed fabric was lighter, I though I'd get away with it because it seemed to match pretty well, but I didn't think about what else I would be wearing with this top. There's no way I would wear a skirt or pants in as light a colour as the hand-dye. The only rescue I can think of at this stage is to throw the whole thing into a dye bath when I next have a suitable colour handy and see if I can get the colour more uniform. Of course, then it won't match the skirt, unless I throw that in the dye bath too.

Thursday, February 26, 2009

Curved Seams

I am still working on the teal singlet top. For an afterthought, it's taken a lot of time and attention. I'm hoping I didn't promise a step-by-step for the lining process, because it's just not going to happen. The lining is happening, but the step-by-step is not. I'm making it up as I go along and that's not a good recipe for demonstrating. Now I know why, "here's one I prepared earlier" is such a well used line.

This morning I'm sorting out the curved seams on the armholes and neckline. I've stitched the two layers together and the next step is to turn the lining in to the inside. Here's the neckline seam:

I've trimmed and clipped the curved seam to reduce bulk and help it to sit smoothly when it's turned to the inside. Curved seams always need to be trimmed and clipped.


My next step is to sort out the shoulder seams which I've left open to turn the lining through. Then I'll top stitch the armholes and neckline. Last of all I need to finish off the bottom hem. I may yet get to wear this top before the cold weather sets in.

Marilyn's Quilt

Here's Marilyn's first quilt. I used it for "Show and Tell" for my beginner patchwork class last night. We've been spending a bit of time in each lesson looking at fabric choices and I think this combination really works.

Wednesday, February 25, 2009

In the News

In this case, "in the news" is good news. Our local paper published a little story and picture about the new Patchwork by Machine class at the Neighbourhood House. Sorry, the pic is on it's side here--I don't know why, it's the right way up in my file . . .
I have borrowed Marilyn's quilt for "show and tell" at tonight's class. Hopefully I'll get to do some sewing of my own tomorrow morning. It's been a bit full-on lately.

Tuesday, February 24, 2009

Lining, Step by Step

My lined teal top is still on the "to do" pile. Meanwhile, I've completed this lined evening bag. It's a simpler shape than the top, so I've taken the opportunity to provide a step by step on the lining process.

1. Two bags, made in the same way. The darker brown is the outer layer--it's seams are turned to the inside. The lighter brown with the woven checks is the inner layer--it's seams are turned to the outside.

2. I put the inside layer on the inside, so the two sets of seams are now sandwiched together. 
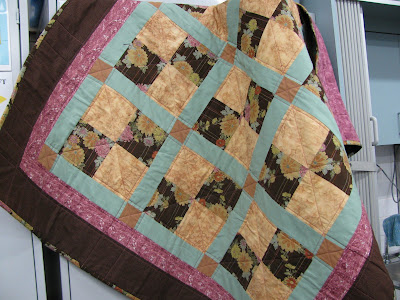
3. I finished the raw edges at the top of the bag by turning them to the inside and adding the bright orange casing for a cord. The row of orange stitching holds it all together.

Sunday, February 22, 2009

Blog Dilemma

A little while ago I gave out a "word puzzle" to do with "what is a good name for some-one who sews?" Today I have a related dilemma. I have two blogs. This one for beginner sewing people, and coincidentally sharing stories and pictures about my sewing. And my other blog--ztwistart.blogspot.com-- which is about my textile art work, experiences and ideas. Earlier this week, my beginner patchwork class made it into a post or two here. That seems fair enough. The issues are relevant for beginning to sew. Today my friend V's quilt made it into my other blog. It's a beauty! And it got me thinking about colour schemes which go beyond the quilt itself. That seems fair enough too. So here's my dilemma . . . when does sewing become art? Ideas please . . .

Interfacing

This uninteresting-looking stuff is interfacing:


In this case "uninteresting" is just fine, because this stuff is designed not to be seen. It is mainly used to reinforce or stiffen areas of fabric in a garment or project. The collar of a shirt would be a classic example. I've got it out today because I'm making a silk evening bag and I need to reinforce the base.


Interfacing comes in a variety of weights and presentations. This one is iron-on. You might just be able to see the shine of the heat-activated glue on the upper part of the pic. Here it is ironed in place:

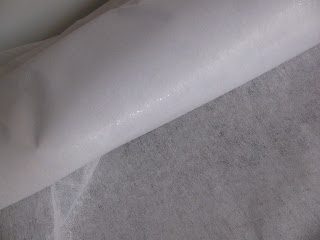
I've folded over a corner of the fabric so you can see that it's not visible on the right side, though the fabric does, of course, handle differently.


Just a warning about anything "iron-on", make sure you don't melt a bit of the glue onto either your ironing board or the sole-plate of your iron. It makes sticky dirty marks. If in doubt, it's worth using a piece of scrap fabric in between.


There can be a bewildering array of rolls in the shop when you go to buy interfacing. If your pattern doesn't specify what to buy, you can ask for help and describe exactly what you're planning to use it for. Hopefully the sales assistant will be able to guide you through the choices.

Happy Birthday Charlie Cat

It was Charlie Cat's birthday a couple of weeks ago. I don't normally make gifts for cats' birthdays, but the combination of a gorgeous cheeky cat and a gorgeous cheeky fabric begged me to make an exception. Charlie Cat loves boxes and he loves comfort. His human is the owner of the original skirt with attitude from earlier posts. So all in all, I thought it was worth putting a bit of effort into this one. Here's a close up, which demonstrates how eye-smacking the fabric is, but also how I've made two flat pieces of fabric into a 3-D cover for a cardboard box:
  1. I cut two squares of fabric. With right sides together I stitched around three sides of the square. That gave me two vertical seams, like the one you can see in this pic, plus a horizontal seam, which is hidden along middle of the bottom of the box. Basically like a flat bag.
  2. The tricky bit is the seam you can see at the bottom of the pic--it was made by folding in a double triangle of fabric at right angles to the other seams. This fold brought the side seam and bottom seam together. It's another origami trick. The seam was stitched along the base of the triangle.
  3. When I folded the triangle down into the base of the bag, I got a three-dimensional shape which encloses the cardboard box.
  4. I made the "bag" twice the height of the box, so the excess folds down to line the inside of the box.
  5. Then I made a cushion out of the same fabric to fill in the bottom of the box and make it comfy.
I think this is going to be a one-off, but it was fun. Now I'm looking forward to hearing how the recipients--both feline and human--like it.

Saturday, February 21, 2009

One-way Print

I bought this fabric on sale a long time ago. For the last few months it's been out and about in my sewing room while I've been playing with ideas of what to do with it. Today one of those ideas got as far as a sketch with measurements. The next step is actually cutting out. It was only when I spread the fabric on the cutting board that I noticed that it's a one-way print.
Most prints are designed so that they work equally well in both directions. One way prints have an obvious up and down orientation. They don't work both ways. Just as well I noticed before I started cutting, or I would have had a lot of these cool cats upside down and I would not have been happy about that. More about this project later, but for now . . . beware the one-way print!

A Fragment of Prettiness

Tidying up is the order of the day. Just to prove the point, here's what the nearest corner of my cutting table looks like:

  • * The featured "pretty" in the middle is a couple of sample squares from my quilt class. These are the fabrics I'm planning to use to make a demo quilt alongside the students.
  • * The pen, should be in my handbag.
  • * The pincushion is one of several that live in this room, but it really doesn't have to be on the cutting table unless I'm actually pinning something out.
  • * on the left we have a piece of bubble wrap, which is part of the packaging from my new computer
  • * the scrap of yellow fabric is leftover from the cutting frenzy of Wednesday when I was preparing for my new class.

And what I photographed is just about the clearest square foot in the whole room--floor included. So I have a task ahead of me.

Friday, February 20, 2009

Defragmenting. . . I Wish!

I've been learning a bit about my computer lately. When I started blogging I really wanted to think of the computer as a silent partner. But over the past few weeks it's been quite noisy in it's demands for my attention--to the detriment of my sewing. In the process, I've learned a bit more about my computer.

One of the things I've learned about in my attempts to get my computer to behave, is "defragmenting a disc". Apparently when the computer stores files on a disc it sometimes puts bits of files in different places rather than all together in the one place. Over time the result is inefficiency. The computer's performance slows down because it takes more time to find the bits of files in their various locations . . .

Well at the moment, my sewing room definitely needs to be "defragmented". I've had a busy few weeks and I've got bits of projects all over the place--half my cutting board is covered with bits and pieces, there is a pile of quilt cutting equipment on my ironing board and several boxes spilling over on the floor. My sewing desk isn't much better, papers and accessories for my new computer are mixed up with pincushions and boxes of elastic and rolls of ribbon. And I'm definitely suffering from inefficiency and slowing down of my performance.

There's a command on the computer somewhere that tells it to defragment its discs. Unfortunately there's no such button anywhere in my sewing room, so I'm going to have to do the task manually. And if I remember correctly, even with its magic button, cleaning up my computer discs took most of the day. I'm afraid my sewing room will take about as long, or longer . . . and I'm out this morning . . . at a computer class:) . . . so it will have to be tomorrow. So, "defragging" here we come, and I'll look forward to some more happy and efficient sewing after that.

Thursday, February 19, 2009

Patchwork Class Update

It was a busy, busy day and evening with seven brand new patchwork students and only a couple of days notice that the class was really going to go ahead. I spent a few hours cutting out squares of fabric for a warm up exercise to help students get to know each other and at the same time experiment with fabric choices and colour matching. Here are some of the left-over patches:
I found it quite revealing to be reminded of the vast array of fabrics, even just in my little sewing room, let alone out there in the shops! And then watching the students try out different combinations and come up with matches that I hadn't thought of! We had everything from a couple of busy bright prints together to the palest of pretty pink pastels. Next week we'll get to see how the 9-patches made from their own fabrics come together.

Now my sewing room is a mess, so my next task is to get things sorted out a bit.

Wednesday, February 18, 2009

Why Pre-Wash Fabric?

Pretty red print quilting cotton--it can be a trouble maker, despite its innocent appearances . . .
My "Patchwork by Machine" beginner class starts at the Neighbourhood House tonight. I'm looking forward to it. There are eight students. Several of the students are on the Neighbourhood House staff in one capacity or another and lately every time I drop in there I'm greeted with a sample of fabric, or a choice of colours, or a dilemma about fabric choices, or just all round general excitement about the class. It's been quite a build up and since the Neighbourhood House is all about developing community, I guess we're ahead already, even before the class begins.

Yesterday's dilemma came in the form of a little jar of water. The point is, the water was a reddish colour and it shouldn't have been. L had done the right thing and pre-washed her gorgeous red fabric ready for the class. Red water was the result. Not a good start! Especially since her contrast fabric is a lovely delicate red on white print. I gave her a bit of my "hi-tech wash off" to soak the fabric in. Hopefully that will get rid of any loose dye that's still hanging around.

I put instructions to pre-wash and iron fabric for the quilting class on the list students were given when they enrolled. I did that for three good reasons--aren't there always three good reasons!
  1. To wash out any excess dye and sizing. Excess dye can stain other fabrics in the project when it is washed. That's not nice. Sizing is the starchy stuff that manufacturers use to finish their fabrics for presentation in the shop. That's fine, but sometimes lots of sizing disguises a really poor quality fabric. I'd rather know about that before I put a lot of effort into sewing it up.
  2. Shrinkage--even good quality cottons can have up to 3% shrinkage on washing. 3% doesn't sound like much, but that's 3 cm out of every metre. Also different fabrics shrink by different amounts. If they shrink after they're sewn together that causes puckering and distortion. Better to get the shrinkage out of the way before starting the project.
  3. General misbehaviour:) Some fabrics don't behave well when they are washed. Maybe the grain-line is distorted, or it's a fabric that just frays a lot, or the texture of the fabric changes . . . whatever the problem is I want to know about it ahead of time. Then I can either adjust my project or choose a different fabric.

As for ironing, it's not my favourite activity, but it makes my cutting more accurate, and that makes it worthwhile.

Monday, February 16, 2009

Sewing Machine Needles

My sewing task for this morning was to make a couple of marsupial pouches. I'll admit, that's a rather unusual task, even for some-one who specialises in unusual tasks and improvisation. I was having a go at making these pouches because I met a wildlife carer at my local pet shop last week. On top of the huge human toll of the bushfires, there is, of course, a huge impact on wildlife. Denise told me that she knew of seven wildlife shelters that had been burned. So she is busy with injured wildlife and could use some extra pouches to keep the babies in.

The challenge for my sewing, is that these pouches need to be well padded. I made the first one with several thicknesses of flannelet and a plain cotton outer layer. I wasn't sure that it was thick enough. So, I added a layer of quilt wadding to my next attempt. That made for a softer pouch, but it was hard on my sewing machine. I broke two needles on that pouch, so I'll have to try another way.

But, it did remind me to write about sewing machine needles. Here's what a machine needle looks like:

  • * nice sharp tip
  • * the eye of the needle is just above the tip
  • * long straight shaft
  • * the top end is shaped--one side is curved and the other is flat.
Here's how to replace the needle:

  1. loosen off the screw holding the needle in place. That's it on the right hand side.
  2. remove the old needle--dispose of it thoughtfully. Remember, it's sharp!
  3. slide the new needle in place--in my machine, the flat part goes towards the back. Because of the shaping, you can only put the needle in one way.
  4. tighten up the screw again firmly.

Some points to remember--sorry I didn't intend the pun, but I'll leave it there now:)

  • * sewing machine needles are a consumable--they need to be changed fairly often. If your machine isn't stitching nicely, try a new needle, it's often the solution.
  • * there are different needles for different tasks: finer ones, stronger ones, special tips for different fabrics, even double needles for making two rows of stitching at once. Match the needle to the task.
  • * Be nice to your needle. Don't sew over pins. Don't tug at the fabric while the needle is down. And don't expect the needle to manage too many layers of fabric--note to self there!

Saturday, February 14, 2009

Thank You

A friend of mine asked if she could drop in the other day. She's not some-one I know all that well, and I couldn't understand why she should all of a sudden want to come over. I must admit, I fretted about it a bit through the day, wondering what might be wrong, what she might want . . .

As it turned out, she didn't want anything--except to say "thanks" for a couple of little things I'd done for her a few months ago--and she brought a gift of pretty and useful little things for my sewing. Among them was this magnetic pin holder.
It's taken up residence just next to my sewing machine. I can put pins in it without even looking! It's my favourite colour, blue. And maybe, just maybe, it will help me to remember not to worry unnescessarily!

Friday, February 13, 2009

Stitching Up Technology

I've spent the morning at a computer class. It's my new adventure for this year--well, maybe more like my new discipline for this year. So I've spent the morning honing my word processing skills. Now that I'm home for the evening, I have my new computer to set up. I'd rather be sewing, but that will have to wait until tomorrow.

Thursday, February 12, 2009

Matching Thread Colours

What with all of the stitching and un-picking and extra seams and bits and pieces on this project, I ran out of thread yesterday. It was too early for the shops to be open and I was keen to get a bit more sewing done, while I was on a bit of a roll, so I tried using grey thread. Here's the result:
The seam in the middle of the pic above was stitched with the grey thread on the right. Can you pick it? The thread on the bobbin at the top of this pic is the thread I was using originally and the spool at the bottom is the one I bought when I went out yesterday afternoon to take a friend for a driving lesson. Luckily there was a sewing shop across the road, and this was in their range. I think I got away with that one pretty well and managed to get ahead a bit more on this project.

The grey thread didn't look so good on the plain fabric, though. I think maybe a slightly darker grey would have been better:
I decided I could get away with it for the lining--I've had enough of unpicking for a bit.

Wednesday, February 11, 2009

2-Dimensions; 3-Dimensions

While I was supposed to be falling asleep last night at the end of a full day, I found myself trying to figure out which seams I'd have to leave open on the lined top so that I could turn it through without ending up in a big tangle. I think I've got it figured out, and I'll soon find out when I get that far on this project, but it reminded me of the fact that sewing clothes is really like doing a big 3-D puzzle. It's all about taking something flat and turning it into something that will cover a solid object--the human body.
  • * making the skirts, I took two flat pieces of fabric--almost rectangles, give or take a bit of shaping--joined them at both sides, and hey presto I had a tube-shape, aka skirt.
  • * the shorts were a combination of three tube shapes. You could think of each leg as a tube made of two flat pieces of fabric. The upper part of the shorts is basically just like the skirt: a front piece and a back piece joined at the sides. Things got a bit fancier in the seaming department because the legs and body part of the shorts have to be continuous. So there was that origami trick of sewing the crotch seam.

  • * now for the top. It's a more complicated shape again. If I really simplify the main body part, I could think of it as a tube--with provision made for various bumps and curves. Then I need to allow for somewhere to put my arms through. And seams at the top to cover my shoulders. Here's one I prepared earlier:

Actually I just took it off the washing line. . . just for now, ignore the front shaping for the bust, and notice the side seam and shoulder seams--those are the basics. I've already gone through finishing off the curved edges--and we won't mention the word ironing!

Tuesday, February 10, 2009

Lining a Garment

Now that I've demonstrated my well-practised unpicking skills:) I can think about how I'm going to put this top back together again.

The basic plan for making a lined garment is this:
  • * make two of everything: one for the outside layer and one for the lining.
  • * sew the outside layer to the lining layer--exactly how that happens depends on the shape of the garment.
  • * Turn the lining to the inside of the garment and make sure it's going to sit happily
  • * The clever thing is that the seam allowances of the two layers face each other in the space between the layers, leaving a nice smooth finish on both the inside and the outside!
  • * finish off any other bits and pieces that need doing, such as hems, and that's the job done.

For a simple shape like a skirt, or even pants, that's straightforward enough. The lining is usually attached at the waistband and turned to the inside, it hangs nicely and the only thing to sort out is to make sure it doesn't peep out awkwardly at the bottom. For a top, it's a bit more complicated, because of the complex shape formed by the combination of the neckline and armholes. Planning which seams to leave undone so that the turning through part doesn't turn into a glorious tangle is the critical step.

My first step though, is to assemble each of the two layers. I'll get on with that and then look at how to combine them.

Monday, February 9, 2009

Unpicking Seams

Just at the moment, progress on this top means going backwards--unpicking a couple of seams so I can try putting it together another way.

So here's a step by step to using the "reverse sewing instrument"--the stitch ripper. Sometimes, as the name suggests, you just have to rip the stitches a few at a time. But sometimes you get lucky and this trick works.

Pick up the bobbin thread--the underneath thread:

Gently and firmly pull it out--you don't want to break the thread. The seam will gather up as you pull until the bobbin thread comes right out:
Then when you turn over to the other side, there's nothing holding the top thread in, and it just lifts off:

If you try it from the other side--the top side--the stitches will lock and you won't be able to pull them out. Sometimes they lock anyway, in which case you have to go back to ripping out a few stitches at a time--usually that's best done by pulling the seam apart and slipping the unpicker between the layers of fabric. You do have to be careful not to catch the fabric with the point, which is why it's nice if this little trick works for you.


Sunday, February 8, 2009

Fabric Choices

A while ago I listed, fun, fit and features as three good reasons to sew. Yesterday had me thinking about fabric choices, which I guess could go in under features.

I was thinking about fabric choices, and in particular fibre content--what the fabric is made of--because yesterday was the hottest February day on record here in Melbourne. It was in the mid-to-high-forties and that's HOT for any time of year. There were bushfires in many areas of country Victoria. It was not a good day.

All I really had to worry about, for myself, was how to keep reasonably cool. I chose light-weight cotton shorts and a top. Both made by me. For some reason I find it hard to find really light cotton clothing to buy here, despite the fact that we do get into the forties for at least several days each summer.

But of course with the smell of bush fires in the air and the news reports full of communities in danger, there were more important things to think about than just my personal comfort. Which reminded me that a woollen blanket is a great asset in a bushfire. Wool is naturally fire retardant. It is hard to burn. In fact one of the wool mills from which I buy spinning and knitting supplies also has Country Fire Authority recommended woollen fire blankets on their website.

As for cotton, it's a known hazard for children's PJ's and nighties--especially is they're loose fitting, and especially where there are heat sources around--because cotton is made of cellulose , which is the same as what wood and paper are made of. Cotton burns easily and it's hard to put out. So it's comfortable for hot weather, and dangerous near fire.

Friday, February 6, 2009

Patching Together Possibilities

Here is the current incarnation of my teal singlet top: It's been a case of making it up as I go along. I didn't like the look of my first idea and my attempt at a front yoke with a curved seam ended up looking strangely bubbly and wonky. As you can see from the amount of fabric on the front of the top in the pic, my bust is distinctly 3-dimensional, so I need to be careful how I draw attention to it--or preferrably don't.

I've had a look in the mirror with this version up against me, and I think it's going to work ok.

Now for a bit of a technical challenge. . . I mentioned that I've needed two thicknesses of the voile throughout this garment. I've only got one layer of the hand-dye in the lower centre-front panel. So I think I'll take the opportunity to demonstrate lining a garment. I'll have to unpick the three seams I've already done, but that's OK. I needed to get as far as this to convince myself that the layout was going to work.

Thursday, February 5, 2009

Hand dyed Cotton

Here's a close up of the hand-dyed cotton I've incorporated in the top I'm making. It was a remnant of embroidedred cotton I'd picked up somewhere or other. I threw it into the dye pot one day when I was dyeing something else. Before I threw it in the dye pot I checked to see if the stitching thread was made of cotton as well as the background fabric. It was! So the emroidery thread has picked up colour, sometimes better than the background.

Just in case you're wondering, the irregular colouring is deliberate. I like a bit of randomness in my life and hand-dyed fabric is a nice safe way of getting a bit of randomness.

Wednesday, February 4, 2009

Word Puzzle

By the way, what's a polite term for a person who sews? I've gone to write "sewer" several times in recent posts and each time I've gone back and changed it, when I read over what I'd written. I don't think anyone wants to be called a sewer, at least not in print. It comes off the tongue ok for me. Sew-er and sewing person both sound a little stilted.

Suggestions, please . . .

Please! Can I Have Some More?

You would think I'd have learned by now, but that irresistable sense of frugality, determination, with perhaps a hint of creative genius, caught me out again.

There was fabric left over from the cotton voile skirt project. Now, this is where it gets tricky. There was a fair bit of fabric left over, but not a lot of fabric. And I thought it would be good to see if I could get a nice little singlet top out of that bit of fabric--or rather out of those bits of fabric, because of course it was lots of little bits rather than one big bit.

There's the trap!

Once I start trying, it's so hard to stop.

It would have been easier if the fabric hadn't been voile, because I needed double thicknesses for most of the panels. I also had a small piece of hand-dyed embroidered cotton fabric in a matching colour which I incorporated. So I tried and tried again and turned and contorted in my brain, until I came up with this layout: Both back panels are cut out of the teal voile left over from the skirt project. The front panels are cut from the hand-dyed fabric, but there wasn't quite enough to get the full length of the centre front panel, so I've added a bit of the voile, which I'm hoping will blend easily enough. I still have to work out how to get a second thickness out for the centre front, because I haven't got enough of the voile for that piece.

And yes I did put in a call to the fabric shop to see if they had just one metre or so of that fabric left! I tried not to sound too desperate, because of course this whole thing is a bonus. And no, they didn't have any more.

Moral of the story: I suggest you don't try this, unless you are a more patient person than I am, or very good at spacial orientation puzzles!

Overlocker Pros and Cons

I'll admit it, I do love my overlocker. I've had it for four or five years now and it certainly makes life easier, especially when I'm doing lots of sewing.

Advantages. . . as I hinted in my last post when I whipped up the double flounce skirt in a couple of hours
  • * It stitches a double row of straignt stitch and a neat raw edge finish all in one go
  • * what's more it trims the fabric to match the overlocked edge, so there are no raw edges visible at all
  • * more importantly, the straight stitching line is stretchy, so when sewing stretch fabrics the seam moves with the fabric--the alternative on a regular sewing machine is sewing seams with a narrow zig-zag stitch instead of a straight stitch or stretching the fabric as you stitch.
  • * the rolled-hem function gives a nice narrow edge finish which I'm happy with as a visible feature on my garments. I'm lucky, my overlocker switches to rolled-hem by moving a couple of levers and a dial--older overlockers had to be re-threaded and adjusted to do rolled hems

. . . so, what's not to like?

Disadvantages . . . or why delay?

  • * It's another expensive appliance, and unlike sewing machines, I don't see a lot of second hand overlockers come up for sale
  • * It sews with four threads (the number of threads is variable, but mine has four)--that means four lots of threading up and four lots of tension adjustments. The threading and tension adjustments can be fiddly.
  • * It's another set of skills to learn

. . . so, not really disadvantages, just good reasons to think first.

I fell in love with my friend D's overlocker when I was making up a bunch of stretch garments. I'd just been on the Great Victorian Bike Ride and had made a lot of my own bike knicks, jerseys etc on my regular sewing machine. Then I made a set of rash vests on D's overlocker. The contrast was amazing! I bought my overlocker a week after I got home from that trip! And I do use it a lot. I'd definitely recommend an overlocker if you're planning to do a lot of stretch sewing, but for regular sewing, it can be nice--very nice--but you really don't need it.

Tuesday, February 3, 2009

Confessions of an Overlocker

Here it is: I admitted in my last post that I used the overlocker to help me whip up the double flounce skirt in just a few hours. At the same time I'm saying, "you don't need an overlocker".

Here's why I used it for the skirt
  • * the fabric is a cotton voile which is semi-transparent. That means the seams are sort of visible through the fabric from the right side. The overlocker makes a nice neat finish for the raw edges.
  • * I was in a hurry. The overlocker finishes the raw edge at the same time as it stitches the seam. That certainly speeds things up. For a light-weight garment like the skirt, the overlocker seam is strong enough on its own. For something heavier, like shorts, I would have used a machined seam as well as the overlocker seam.
  • * I had two flounces to finish. That's a lot of curved raw edges. The overlocker has a rolled hem function which makes a narrow edge which I don't mind as the finished edge of the skirt. Again it was a quick solution.

There are solutions to all of those challenges using just the regular sewing machine. That is, there are solutions to all the challenges except time. I'd got it into my head that I wanted to wear that skirt yesterday. The overlocker made it possible.

Having said all that, the reason I bought the overlocker a few years ago, wasn't to finish ordinary garments more quickly. I bought it for stretch sewing, which is a different challenge altogether, and a story for another day.

Monday, February 2, 2009

Done!

Here's the skirt done! And I'm about to head out the door wearing it.
I'll admit now and explain later: I did use the overlocker, and no, you don't need one, but it does make some jobs nice and quick.

This One's for Me

If there's anything better than a flounce, it's got to be two flounces! This is an old favourite skirt pattern of mine. I must have half a dozen of these, all made from different fabrics. This one is going to be teal cotton voile. The pic shows the pattern pieces all cut out and a scrap of fabric so you can see the colour.

Sunday, February 1, 2009

Lost in Space

The patterns for the little skirts are somewhere in my sewing space. I can remember labelling them neatly and putting them away somewhere other than in my usual patterns box. At least I think I remember doing that. I've been through my pattern boxes several times and I can't find them there.

I remain, ever yours, truly frustrated out of my brain!