Wednesday, December 31, 2008

A Circle by any other Name

So, the plan is to lengthen and jazz up a hardly there little denim skirt with a gold sequinned flounce. Seems like an appropriate activity for New Year's Eve, even though I'm planning to go to bed early like a "granny".

But what is a flounce? It's really just like the circle skirts that my friend Anna made for her nieces, but instead of being the whole skirt, it's added to the bottom of something else--in this case it will be added to the bottom of the little denim skirt.


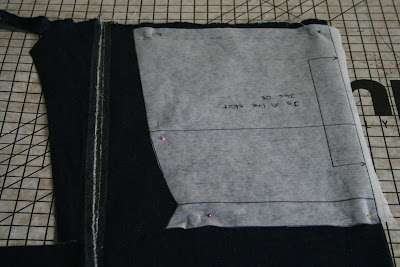
Here's the circle cut out. You can see where I've marked the inner circle ready to cut. The circumference of the inner circle will match the bottom of the denim part of the skirt . . .

I'm not in the mood for maths this morning, so I'll leave those details to another day.


Here's a pic of it all cut out. I've cut it on the fold, so you can only see half in this pic.

Tuesday, December 30, 2008

Wrong Side-Right Side

I'm still playing with the idea of adding length to a third demo skirt. So I've been looking through my bits and pieces of fabric to find something I can use. I came across a largish piece of gold jersey with gold sequins on it . . . don't ask how it came to be there! I think it would make a great flounce on the bottom of a hardly there little denim skirt.

Next decision, do I use the obvious dark denim as the "right side" for this skirt, or will I use what is technically the "wrong side"?

Denim is one of those fabrics that has an obvious right and wrong side, since indigo, the dye used for the characteristic denim colour, is a surface dye. So it behaves almost like a printed fabric where the colour has been applied to one side of the fabric only. So what?! A friend of mine who taught me sewing always says, "The right side is the side of the fabric which you want to put on the outside of your garment".


In this case I'm thinking of putting the lighter side on the outside of the skirt, because I think it matches better with the lighter gold of the sequinned material. Unfortunately the shine of the lurex in the denim doesnt' show up very well in the pic, but believe me, it's there!

Saturday, December 27, 2008

Ideas for Skirts

I'm still thinking about the demo skirts . . . though I haven't got around to doing any more sewing in the past few days.

I don't quite have enough of the denim fabric for a third skirt, but it's too much to waste. So, I'm wondering about adding a ruffle or a flounce in a contrast or toning fabric to add a bit of length. I'll just play with that idea for now.

Friday, December 26, 2008

Christmas Gifts

I love to receive gifts that have a personal touch--chosen or made with just me in mind. I guess that's why I often like to make gifts for my friends, though I didn't get to do much of that this year.

Here's a hand-made bag given to me by my friend Anna--beautiful indigo fabric and by virtue of some clever seaming, which I haven't quite fathomed yet, reversible too . . . oh, and that's Dorothy the Sheep keeping an eye on things!

Thursday, December 25, 2008

Happy Sewing Christmas

The sewing room is full of boxes--how to quickly make the living room look decent!

But one of the boxes is particularly significant . . . I bought myself a couple of room coolers as my Christmas treat. So now I have a nice tower fan-evaporative cooler thingy especially for my sewing room.

I'm looking forward to a summer of happy sewing regardless of the heat!

Happy Christmas:)

Wednesday, December 24, 2008

Santa's Workshop

I visited Santa's Workshop yesterday afternoon--aka my friend Anna's lounge room. She was working on circle skirts as Christmas gifts for her nieces. She'd chosen Windsor Satin with matching cotton prints to reflect each girl's tastes and interests. She made the main skirts out of the satin and used the cotton print to make a bias edging for the hem and a waist casing.
Since the girls are still quite small, Anna was able to cut the whole circle for each skirt out of a single piece of satin.

I loved the juxtaposition of Anna with her scientific calculator and the pretty pink satin: here she is calculating 2 x pi x radius to check the size of the waist opening. Of course sewing is perfect combination of science and arts!


Monday, December 22, 2008

Waist Casing: tips and tricks

I have to admit that threading the elastic through the waist casing is not my favourite part of the whole exercise. Here are a few tips that make the job easier.
  • When I'm sewing down the fabric for the casing at the top of the skirt and when I'm putting up the hem at the bottom, I work out which way the side seams are going to lie. I make sure they lie in the same direction each time. I don't press the seams open.
  • Then when I thread the elastic through, I make sure that I'm heading in that same direction again. This means that I can't get caught in a blind corner where the edge of the seam is on the inside of the casing.
  • I use a few safety pins to thread the elastic. I put two in the end that I'm going to thread: that's one to use and one for a back up in case the first one pulls out. I pin the other end of the elastic to the skirt near the gap in the casing--that way I can't accidentally pull the end right through. It's also insurance against twisting the elastic while threading.
  • The safety pin that I'm using to thread with points backwards, ie with the blunt end leading the way. I'll be pulling and pushing this end and I don't want to accidentally open the safety pin . . . believe me, I've done it and I have the scars to prove it!
  • I have a huge safety pin I use for this job--nappy pins are ideal because they usually have some sort of safety catch.
  • I check twice that I haven't twisted the elastic on itself before I stitch the ends together.
  • I overlap the elastic by a couple of cm and stitch it together with a coule of rows of zig-zag stitch
  • I stitch down the gap in the casing with the matching thread and add a little loop of ribbon to mark the back of the garment--this isn't really an issue with these skirts becasue the fronts and backs are identical, but it's really handy with shorts and slacks.

Sunday, December 21, 2008

Two Hours, Two Skirts--Too Easy!


Here's how I put the skirts together:

Warning: May contain traces of nuts!
I've been sewing for about 30 years, I'm just telling you it took 2 hours to show off:) Allow yourself at least twice as long as that, and if it starts to drive you nuts, take a break and come back to it later. This is supposed to be fun.

1. Front and back of skirt, right sides together.

  • pin at right angles to the line you're going to sew


  • sew a 1 cm seam, using straight stitch

  • pull out pins before you come to them--if the sewing machine needles hits a pin it's not pretty.
  • use reverse at each end of the seam to secure your threads

2. Do the same for the other side seam

  • I should say, press seam to one side, but I'm naughty and I didn't do that.

3. Neaten the edges of each seam using zig-zag stitch

  • use the widest setting on the zig-zag and let the needle just swing off the edge of the fabric.


  • this isn't just about being tidy, if you don't finish off your edges they will unravel when the skirt is washed.
  • you also need to neaten off the top and bottom edges of the skirt with a row of zig-zag.

4. Turn the casing down at the top of the skirt and stitch in place.


  • leave a small opening so you can thread the elastic through later.

  • I use a green pin at the start and a red pin at the end to remind me to leave a gap--too many times I've gone too far and had to unpick it.

5. Turn up the hem and stitch in place.

  • I like to use the guide-lines on the base plate of the sewing machine to keep my stitching even.

6. Topstitch along the top of the casing and the bottom of the hem--this is cosmetic--it just makes everything look nice and crisp.


7. Measure a length of elastic to fit snugly around the waist when slightly stretched.

  • I used 3/4 of the waist measurment plus 2 cm for the overlap

8. Thread the elastic through the casing, sew the ends together and stitch the gap closed.


That's it--skirt done!


I'll put up a few tips for threading the elastic later.

Bonanza

Well the polls are in and I have two keen young volunteers for the A-line skirt project.
J's measurements:
  1. Waist--high hip: 86 cm
  2. widest point:96 cm
  3. vertical distance from 1-2: 12.5 cm
  4. finished length: 33 cm

E's measurements:

  1. Waist--high hip: 100 cm
  2. widest point: 111 cm
  3. vertical distance from 1-2: 16 cm
  4. finished length: 35 cm

Now for the extra good news: the fabric I got was 130 cm wide, so I can get both skirt pieces across the width. That means I'll get two or even three of these little skirts out of just over a metre of fabric! I guess now is not the time to comment that sewing for yourself doesn't always save money. $5 for a metre of cute denim; maybe another $1 for the interfacing I'm using to make the patterns; not too much work and hey presto! Two happy volunteers:) That's what I'm hoping anyway.

Here are the pics:

Fabric folded selvedges to middle, giving me two fold lines on which to place the pattern.


First pattern piece pinned in place, ready to cut out.


Second piece ready to cut out, I had to flip over the pattern so that the centre line of the pattern would sit on the fold.

Friday, December 19, 2008

Here's What I Chose

Navy denim with a hint of sparkle--it's a fairly light poly-cotton blend and there's a bit of lurex in there to jazz it up. It was the end of the roll, so I ended up with just over a meter. I'm sure the left-over bits will come in handy for something.

I've just taken it out of the washing machine and it's hanging on the line.

Fabric for the Skirt

I'm still waiting on some of the measurements for the demo skirt. I know the waist--high hip really--is 86 cm. And I know it's going to be a short skirt: finished length 33 cm. So I'll only need to buy about 80 cm of fabric. But which fabric? The pattern is designed for a plain weave fabric, so that's a definite, still there are lots of options . . .

Some things to think about
  • it's summer, so nothing too heavy
  • It's going to be slightly gathered into the waist by the elastic casing , so I don't want it to look too bulky there--something light would definitely be nice
  • my friend who is going to wear this skirt is no more into ironing than I am, so something that won't crush and wrinkle too easily--maybe a poly-cotton blend. If I use 100% cotton, maybe a crinkle cotton or cotton plisse--these are fabrics that have built in wrinkles or bumps, so they don't need ironing.
  • Blue is the colour of choice: is that a print or a plain blue? I'll have to ask. If it's a print, it will have to be a small print, because the whole skirt is so small.

. . . watch this space . . .

Wednesday, December 17, 2008

Update

Skirt demo to come . . .

Meanwhile I've finished the "too huge to photograph" doona cover. Sorry, no photos, it really is too huge . . . and the intended recipient is also one of the intended readers of this blog.

NOTE TO SELF: next time I do a King Size anything--assuming there is a next time--go to the Neighbourhood House, push all the teaching tables to the centre of the room, cover with a couple of woollen blankets and do the ironing there. Even my super-sized ironing board doesn't cope with 2.4 m of fabric in one go. Or rather, my shoulders don't cope with it too well.

Cutting out your A-line Skirt

This pattern is designed for a plain woven fabric. Most of these fabrics are sold as 115 cm width. So the amount of fabric you'll need to buy is twice the finished length of the skirt, plus about 20 cm to allow for the casing, hem and any wastage--for example if the fabric isn't cut quite straight off the roll there will be a bit of waste.

Here's what to do:
  1. First, wash, dry and press your fabric
  2. Fold the fabric in half lengthwise. The selvedges will meet together on one side and the fold where you place the pattern will be on the other side. Make sure the fabric is lying smooth and flat.
  3. Pin the pattern to the fabric with the straight edge of the pattern piece up against the fold line.
  4. Cut it out--use sharp scissors and make sure the scissors are held at right angles to the fabric so that your cutting out is accurate.
  5. Do it all again to get your second pattern piece cut out--or you could make a second copy of the pattern, whatever you prefer.

Ta da . . . a skirt front and a skirt back ready to be stitched together!

OK, to make this realistic, I really should find a bit of fabric and do a demo. Do I know anyone who needs a new little A-line skirt? Volunteers, please step forward now!

Tuesday, December 16, 2008

Correction

One more thing I forgot to add to the skirt pattern yesterday--I need to add a couple of cm at the bottom to allow for the hem. I'll go back and fix that.

Monday, December 15, 2008

Skirt Pattern Continued


I decided to make a scaled down pattern of the A-line skirt to make it easier to take photos.


The front and back of this skirt are identical, so I only need to draw one pattern piece. Also the pattern is symmetrical. The right and left sides are an exact mirrror image of each other. So instead of drawing out the whole pattern, I'm only going to draw half of it. To get the whole thing, I'll fold the fabric in half--along the grain line--and place the pattern piece on the fold. I'll do this twice--one for the back and one for the front piece. So I'm really only drawing out 1/4 of the skirt pattern.

OK: I've got four basic measurements to work with. For all the horizontal lines I'll use 1/4 of the measurement. The vertical lines are as measured.

  1. The waist is a horizontal line near the top of the page--1/4 of the waist measurement.
  2. Next I need to draw a vertical line on the far left of the page--that's the finished length of the skirt. This is the line that will be placed on the fold to cut out the skirt.
  3. Place a mark on this line to show where the widest point is.
  4. Then the second horizontal line is for the widest point--again it's 1/4 of the measurement.
  5. Third horizontal line is the same measurement again, but at the bottom of the line for the finished length of the skirt.

That's the basic skirt outlined on the page, but there are a few things to add.

  • I'm going to need some extra fabric at the top of the skirt to hold the elastic. So I added another line 4 cm above the waist line. This line needs to be wider than the waist because it will be folded down. So this line is tapered out to match.
  • Now I still need to add extra to allow for the seams all around. I think 1 cm is an ok seam allowance. Most commercial patterns use 1.5 cm. There's no seam allowance on the folded edge, since there's no seam there, so only on the side of the skirt.
  • Plus I need to make sure the skirt isn't skin tight. So there's another extra allowance called "ease" The ease makes sure the skirt is actually wearable. I'm working on a pattern that represents 1/4 of the skirt and I think 4 cm ease should be enough, so I'm going to add another 1 cm to allow for ease.
  • One more thing to think about: how am I going to get this skirt on and off? I'll either need to step into it, or put it on over my head. So the finished width at the waist will have to be at least as wide as my widest point. That might mean I need to allow a bit more ease.
  • And right at the bottom--it will need a hem, so I need to add a couple of centimetres there.

Sunday, December 14, 2008

Pattern or No Pattern

I like patterns.

When it comes to sewing, a pattern is like a map of the territory . It's a flat picture of a 3-dimensional reality. Also, like most maps, a pattern isn't completely accurate and needs to be updated from time to time. Some patterns are rough and ready--like the sketch map you draw on the back of an envelope for friend. Others are very detailed. If you think of a pattern like a map, you'd also expect to find a lot of different symbols and marks used to represent different features. You'd be right!

Sometimes it's easy enough to make your own simple pattern. Like a sketch map . . .

OK, let's start with the pattern for a simple little A-line skirt. This skirt will have a slightly gathered waist with elastic.

You'll need a piece of paper or interfacing about the same size as the skirt you want to make. You'll also need a tape measure, a ruler and a pencil. Oh, and a flat surface to work on--that's always a challenge:)

Measure on your body--assuming the skirt is for you--
  1. around your waist--or if you want to wear the skirt on your hips, measure around where you want it to sit.
  2. the widest part of your hips, thighs or bum--the skirt is going to have to be at least this wide if you're going to be able to take it on and off.
  3. the vertical distance between 1. & 2.
  4. The length you want the skirt to be--that's the finished length

Next post I'll sketch out what to do with those measurements.

Friday, December 12, 2008

Top Stitching

The most obvious way to use stitching is to hold two pieces of fabric together. In that case the stitches are nearly invisible from the right side. They are not a feature.

Top stitching is different. It's done from the "top" side of the fabric and it's designed to show. So it's decorative. Sometimes it's only decorative. The stitching line on the right in the photo--the one that's being made where the needle is--is just for decoration. The stitching line on the left--the one that's finished and you can see on the patterned fabric--is decorative plus. It's also holding down the seam on the underside of the fabric. So it's helping to keep everything nice and neat.

Since top-stitching is designed to show, it's important to make the line of stitching as accurate as possible. I like to do that by using the edge of the presser foot as a guide. In this case the left side of the presser foot is lined up with the seam line where the two fabrics are joined.

The third fabric in this piece is a fine stripe. I tried to-stitching on that, parallel to the stripe and it was terrible. Stripes are so unforgiving. It was really obvious every time my stitching wasn't quite straight. So I pulled it out.

Now I need to collect as many pins as I can from around the house and pin this thing together along all four sides.

Thursday, December 11, 2008

Too Big to Photograph

My sewing project today is a King size doona cover. Fairly simple sewing really, except that it's HUGE. 2.4m x 2.1 m huge to be exact. So, no photos.


As for the sewing, it's virtually the same as the pincushion, minus the stuffing and plus a whole lot more fabric. I'm making the front in three sections--three mix and match prints, my first task is putting that together. I'm putting a feature band with contrasting fabric and buttons 1/3 of the way up. I've cut out the back--one big rectangle of fabric. Then, lots of pins and sew around all four sides. Since I've got the button opening on the front piece, I don't have to worry about leaving an opening to turn it through.


Hopefully I'll find a big enough space to get a shot of it when I've finished. For now though, here's a pic of some beautiful pink lillies that a friend of mine left with me to babysit while she travels to India--I'm loving them.

Wednesday, December 10, 2008

Pin cushion Done


Here it is--complete with pins.

A few notes about the hand stitching:

  • Use a length of thread about a foot long. An easy way to measure is to cut the thread about the distance from your wrist to your elbow. That's about as much as most people can handle without getting all tangled up. Also it limits the amount of wear on the thread as it pulls through the fabric.
  • Don't knot the end of the thread. It's better to do a couple of little stitches in the same spot to secure the beginning and end of your stitching.
  • I use a "ladder stitch" to close up little gaps like this. That means taking a little stitch out of each of the sides to be joined in turn. Each stitch is parallel to the seam line. The threads that cross between the two sides look like the rungs of a ladder until they are pulled in tight. Once they're sitting in place they virtually disappear.

Tuesday, December 9, 2008

That Pin-cushion

OK, here's that pin-cushion I suggested as a good first project.


You need
  • 2 squares of plain fabric--10 cm square is good.
  • a matching button

  • polyester fibre fill for stuffing

  • your basic sewing kit


What to do . . .


  1. Place the right sides of the two squares of fabric together and sew around the edges. Leave a gap to turn it through to the right side and for the stuffing. You can use the outside of the presser foot as a guide for your sewing. that will leave a nice width for your seam. Notice that I've sewn a little bit of the fourth side of the square as well as all of the three other sides. That will make it easier to keep the corners neat.


  2. Clip off the corners of the fabric--make sure you don't snip the stitching.


  3. Turn the whole thing inside out--or right side out:) You can use the back of a pen or something like that to poke the corners out. Notice how I've got four corners because I sewed a bit on each end of the fourth side.


  4. Now the stuffing: start with a little bit in each of the corners and then stuff the middle. Just use a bit at a time, but do stuff it nice and firmly.


  5. Next step is to sew up the little opening. I'll do this by hand because the stitches won't show as much that way.


  6. Finally, sew the button on in the middle, through all thicknesses. That will make the cushion nice and plump, so hopefully the pins won't stick out through the bottom.

Monday, December 8, 2008

One more tool


Here's one I forgot to mention in the list of things you need for sewing: it's a "quick unpick" or "stitch ripper". It's got a sharp little point for getting under the stitch and a clever little blade to cut the thread. But it's also more than capable of cutting through the fabric itself, so use it carefully!

Sunday, December 7, 2008

Oops


I mentioned that you need to hold the threads firmly behind the presser foot when you start off sewing a seam . . . Here's what happens if you don't! The threads get pulled into the mechanism in the base of the machine and make a glorious little tangle. Solution? Raise the presser foot and the needle and wiggle and jiggle the fabric gently until you can pull it out. Then hopefully you can snip off the snarl without damaging the material and start again.
You'd think after all these years of sewing that I couldn't still make that mistake . . . well I held the threads, went to sew, but stopped before I actually got started because the phone rang. When I came back to sewing I just continued without thinking. Of course I had to take a photo to illustrate my point!

Thursday, December 4, 2008

Ta Da . .


Here it is: new desk: laptop on its stand and office chair in the left foreground--I am looking after my posture:)--sewing machine and bits and pieces in the centre background, cutting table and fabrics in boxes in the background on the right. The shelves up on the wall have been there for several years, but they got a bit of a sort as part of this project.
What you can't see is the folding bed/armchair thingy on the opposite side of the room from the desk. It is still covered in stuff that needs sorting. Ditto the shelf in the cupboard. But I can do that a bit at a time.

Work in Progress

My sewing room is a work in progress. . . No sewing has actually happened here since I pulled out my sewing desk and storage shelving last week. There's been lots of work happening, though--but with power tools and timber, rather than needle and thread. So far I have a new sewing desk, courtesy of Freecycle and Ikea. It's big enough for my laptop and printer as well as my sewing machine and overlocker, which frees up space for what I hope to be my Etsy shop in the nook that used to house my computer stuff. I'm hoping this set up will make it easier to take photos of my work.

This morning my task is to make a set of shelves to hold my quilting fabrics and cutting board.

Then I'm hoping to get to some sewing!

Wednesday, December 3, 2008

A bit about fabric

It's good to know a bit about fabric and how it's made before you do much sewing.
I think a plain woven fabric is a good one to start with.
I've put together a pic to explain some of the basic terms. I've been learning hand-weaving this year, but I'll try to keep the technicalities out of it and stick to terms commonly used in sewing patterns.
Woven fabric is formed by interlacing threads at right angles to each other. The fabric is strongest and naturally wants to hang in the same direction as it is wound on the roll. This is the direction of the selvedges and the grain line. The grain line is just an imaginary line parallel to the selvedges. It is generally marked on each piece of a sewing pattern to tell you which way to lay the pattern on the fabric.
The cut edge, when fabric is measured off the roll or bolt in the shop is generally at right angles to the selvedges. The trouble is that sometimes it's rolled or cut crooked. It's worth getting this straightened out before you cut out a pattern and start sewing.
I generally wash my fabrics before cutting out. This allows for any shrinkage and washes out the starches (or sizing) that are there to make it look nice one the roll. I want to treat the fabric before I sew it in the same way as I plan to treat it after I sew it. Sometimes I get a nasty surprise when I wash a piece of fabric, but at least then I haven't wasted the time and effort in sewing.
OK, so when I've washed the fabric, I hang it out to dry and make sure it's hanging straight on the line--that means straight according to the selvedges. Then I give it a press to get rid of any wrinkles. I'm not a great one for ironing my clothes, but it's worth it for the sake of accuracy.

Tuesday, December 2, 2008

Matching Thread

My sewing room is still out of action, though I do now have the part I need to put it all together . . . watch this space!


When buying thread you have to decide on a colour. Usually I want a colour to match--rather than contrast--with the fabric. The point is that I don't really want my stitching to be obvious most of the time. I like to match colours by laying the thread on to a sample of the fabric and having a look. If in doubt, I squint at it so that the image becomes blurred. It's usually better to have a shade darker thread than fabric. Lighter thread is more obvious. Also you can err on the side of a bit grayer rather than brighter.


I buy the huge spools of thread in the coloursI use all the time: 500m, even 1000m of black; and then just get a 100m spool to match fabric for a particular project.

Monday, December 1, 2008

Thread

Thread, just buy a spool, right? Well not quite.

A couple of pointers. I think it's worth buying a good quality polyester thread. Gutterman and Mettler are the brands I use most often. Not the cheapy threads that come on the little cardboard spools. Sorry about that, I'm all for saving money, but it makes a difference to your sewing.

Three reasons for buying good thread:
  • the thread is what holds your sewing together. There's no point creating a gorgeous project if the stitching is going to give way.
  • the thread is the item that has the most contact with the workings of your machine. All those loops and hooks and levers, the tension mechanism, the bobbin and the whirlygigs under the foot plate where the stitch is formed . . . the thread runs through them all. Hundreds of meters of thread for every project you sew. I've had several sewing machine mechanics tell me that they know what sort of thread has been used by the condition of the sewing machine.
  • Cheap nasty thread can make it hard for the machine to keep a good tension. This is one you'll notice right away. The tension is what keeps the balance between the top and bottom parts of your stitch. When things are going well, you don't need to think about it. You sew, the stitch forms and it's all good. When it goes wrong, though, you adjust and fiddle and try again and pull out stitching and it's a pain. Sometimes the solution is as simple as what thread you're using.

I'm a hand-spinner which means that I sit at my spinning wheel for hours making yarn--aka thread! I could tell you lots about length of fibres, twist and so on, but you don't need to know all that. Just buy a good quality thread from your favourite sewing shop.

Good thread = happy machine = happy sewing.

Sunday, November 30, 2008

My Sewing Room is Out of Action


Well, my sewing room is out of action today!

Good news is that I picked up most of the components of a new sewing table-work table on Freecycle. All except one piece of the frame and the legs. And it's a current item at Ikea, so the parts should be available.

More good news: a friend of mine was keen to have the stuff I needed to get rid of out of my sewing room to make room for the new stuff . . . and she could pick it up today. So I spent the morning moving and dismantling stuff. All good so far.

Now for the not so good news, Ikea had everything in stock, except the one piece of frame I need to hold the whole thing together. That one piece is out of stock. Correction! It's not really out of stock, but it's stored somewhere that can't be accessed without a fork lift. Of course the fork lifts come in after the store closes and no, I couldn't pay for the item and wait until closing time to get it. I did ask. So I'll have to go back tomorrow to pick up that one part. Then I can put my sewing room back together again.

Right now my sewing room looks terrible. But I'm looking forward to how it's going to look in a few days.

Saturday, November 29, 2008

Getting Used to the Sewing Machine

If you haven't done much sewing before it's worth taking some time to get used to the machine. The sewing machine manual can be a bit intimidating, but it has all the information you need to use the machine well. First look for a picture which identifies all the parts of the machine.

Before you thread up the machine have a go at sewing along some lines on a piece of scrap paper. Draw yourself some straight lines, some corners and some curved lines. Put the paper under the presser foot, lower the presser foot and go. You need to get a feel for how hard to press on the foot pedal to get a steady pace and also get a feel for "steering".

The feed dog is the little mechanism just under where you sew. It actually grips the fabric (paper for now) and pushes it along. So you don't need to grip and push while you're sewing. Just steer gently. Take another piece of paper and see what happens if you let go after you've started sewing. You should find that the machine keeps a reasonably straight line without any help at all.

To turn a corner, leave the needle right down, lift the presser foot, turn, put the presser foot back down and keep sewing. The needle will hold everything in place while you turn the corner.

Next, practice threading up the machine. There will be a diagram in the machine's manual. You will need to wind yourself a bobbin, so do that first. The bobbin holds the thread for the underneath part of the stitch.

Now have a go at sewing some random lines on a piece of scrap fabric. Fold the fabric over and see how it feels to sew a real seam. On most machines you need to hold the two threads firmly behind the presser foot for the first couple of stitches. You know that the sewing machine will hold a steady course, even if you don't steer it for few seconds, so you don't need both hands on the fabric all the time.

Friday, November 28, 2008

My Sewing Machine


The sewing machine I use for most of my work is an old Elna. A Contessa 450 to be exact. I bought it from a garage sale for $20! OK, so I've spent a lot more than that maintaining it over the years, but a newer machine would need at least as much maintenance. I like the fact that it's a solid old thing. It's mechanism is simple enough that I have at least a begin to understand how it works. I recently found a sewing machine mechanic who likes and admires these old machines and now it just purrs along. It has more stitches than I'm ever likely to use.


As for stitches I regularly use my straight stitch--for just about everything. The reverse option is for securing the ends of seams. That's very handy, but not essential. You can tie them off instead. I also use the zig-zag stitch a bit. That's about it really.

My first sewing machine--I still LOVE it--is an old old Singer. It has only one stitch: straight, forward. That's it! It's a perfect little stitch and it stitches through anything. It would take a bit longer, but I could make most of my projects using only that machine.


What do I recommend as a sewing machine for a beginner. Well, something like what I've got, if you can get it . . . old and reliable. You might be able to borrow one from a friend. If you buy a new machine you'll be spending at least a couple of hundred dollars. I don't think the really cheap little machines that are sometime sold for under $100 are worth having.

The sewing machine manual is a must have. It will show you where the machine needs to be oiled and how to thread it up. It's worth getting the machine serviced before you use it.

If you want to have fun and get a good result sewing, make sure your machine is happy.

Thursday, November 27, 2008

Confessions

My computer lives in a little nook in my sewing room. It was out of action most of the day yesterday. A friend came to help me by checking it, cleaning it up and get it going better. That involved lots of technical stuff that I don't fully understand. While she fixed the computer, I tidied up a bit in the sewing room . . .

I came across a shelf of last summer's unfinished sewing projects. Uh oh! and Yay!


  • One light cotton princess-line top: I wasn't too happy with how it fit last year and I was going to tweek it, but when I tried it on yesterday I decided it would do. I wore it for the rest of the day:)

  • Three, yep, 1, 2, 3, pairs of long-shorts in different stages of completion. Two needed the length to be adjusted and one needed to be put together--it had been cut out and abandoned. I finished them all off, wore one pair and tossed the others in my room. Note to self: I don't need any more summer pants for a while.

  • Two rash vests cut out, but not sewn at all. These were for friends in Queensland, where rash vests are a consumable--they spend a lot of time in the pool over Christmas. Of course the girls have grown in the last year, so I have to check if they're still going to fit.

  • Two singlet tops for me--also cut out and ready to sew. I started putting one of them together in the afternoon and hope to finish it off today.

Moral of the story . . . it would have been a good idea to check that shelf before I went shopping for summer fabrics last week. . . . I guess I must have been pretty ambitious--or desperate--when I cut out sooooo many garments and then didn't finish them.


Now I have a clear shelf ready to receive new projects and a few more things to wear. Also a couple of "works in progress" to get on with.


Wednesday, November 26, 2008

Scissors

Aaaaah Scissors! I have them all over the house, maybe not quite one for each of my projects, but close. Alright, I'm a bit over the top about scissors. What do I think you really need?

You need a pair of dressmaking scissor that are used only to cut fabric. They don't have to be fancy or expensive. But they must be reserved for this use only. Paper makes dressmaking scissors blunt. Blunt scissors chew through fabric instead of cutting cleanly through. Chewing through fabric is no fun.

It's also nice to have a little pair of thread-snips. I have a pair attached to my sewing machine with a long ribbon. I use them to snip off the ends of threads at the start and end of seams.

Tuesday, November 25, 2008

Fabrics

Here is a sampling of some of the fabrics floating around in my sewing room today. The bright blue in the top right corner is a striped cotton voile and the floral on the left is a plain weave print. I'm planning to sew myself some summer tops out of these two. I'll obviously have to give them a bit of a press before I cut them out. I love wearing cotton and I don't normally iron my clothes, but it's nice to get rid of any wrinkles which might make cutting out less accurate.

Getting Started

To get started sewing you will need:
  • fabric
  • tape measure
  • scissors
  • pins
  • a pin-cushion is nice--it's an easy first thing to sew if you don't have one
  • a flat space to lay out fabric
  • thread
  • sewing machine with its manual
  • pattern
  • a bit of time to play and learn
  • pencil to mark your pattern
  • notebook and pen to keep track of what you're doing