Here's how finishing off a curved edge with bias binding works, step by step.
Curved edge--this is the neckline, but I'm going to do an armhole--the process is the same:
 Bias binding opened out, with raw edge lined up with the armhole edge. Lots of pins to keep the edges in place:
 The first line of stitching goes on the fold line of the bias binding.
Then I fold the bias binding through to the inside. This is pretty blue satin bias binding and so I want a bit of it to show on the right side too, so I've folded it over the edge, rather than folding on the stitching line:
 Lots of pins again to hold everything in place--it is a curved edge after all. The next line of stitching goes right on top of the first line of stitching, but now the bias binding is sitting in behind, so it will get caught with this stitching and held in place nicely.
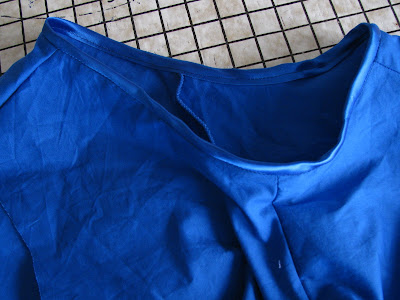
Here it is, all done:
In the previous post, I showed the effect if the bias binding gets folded all the way through to the inside. In that case the second line of stitching just goes on the edge of the bias binding.
Curved edge--this is the neckline, but I'm going to do an armhole--the process is the same:
Bias binding opened out, with raw edge lined up with the armhole edge. Lots of pins to keep the edges in place:The first line of stitching goes on the fold line of the bias binding.Then I fold the bias binding through to the inside. This is pretty blue satin bias binding and so I want a bit of it to show on the right side too, so I've folded it over the edge, rather than folding on the stitching line:
Lots of pins again to hold everything in place--it is a curved edge after all. The next line of stitching goes right on top of the first line of stitching, but now the bias binding is sitting in behind, so it will get caught with this stitching and held in place nicely.Here it is, all done:
In the previous post, I showed the effect if the bias binding gets folded all the way through to the inside. In that case the second line of stitching just goes on the edge of the bias binding.

2 comments:
Am glad that I have found you....
. . . thanks for coming:) welcome!
Post a Comment